How to contribute to this site using GitHub
A tutorial by Jimantha
Welcome!
Section titled “Welcome!”Hello! Welcome to The Sims 4 Modders Reference! If you’re reading this, this means you want to learn to mod the game, or maybe you want to learn how to contribute to this website. Or you want to learn to use GitHub. Or you got a little lost! Whatever the case, I hope this tutorial can help solve your questions!
Feel free to skim through the site, go back and forth through the index, or reach out to me if you have any questions.
I have tutorials and resources that can help modders, or I want to directly write tutorials for the website. How can I help?
Section titled “I have tutorials and resources that can help modders, or I want to directly write tutorials for the website. How can I help?”You can either send them to amethystliliac or Jimantha (that’s me! Hello!), or, if you want to do it yourself, you need to make your own fork of The Modders Reference GitHub repository, and then a pull request.
About sending things to Jimantha...
I can't personally approve changes or update the website, but I can do pull requests, and I don't mind helping out. This means that, even if I make the pull request, it doesn't mean it'll be accepted or merged instantly, or at all. I'm a volunteer, just like you!What’s GitHub and why do you use it?
Section titled “What’s GitHub and why do you use it?”GitHub is a website that allows people to upload their code, have control version, and makes it easy for others to contribute their own code to the project. You can also see people’s projects and learn from them if you’d like!
The Modders Reference uses it so you can propose your tutorials and help building the website. If you have tutorials in other places, you don’t really need to know programming to add them.
You can also make secret/private repos that are only accessible to the people you trust.
Repository? Fork? Pull? What are these things?
Section titled “Repository? Fork? Pull? What are these things?”Frankk wrote an excellent explanation:
a very high level intro:
Repositories (or “repos”) are just projects managed with git, meaning their history is tracked as snapshots in time called “commits”. Every repo has at least one “branch”, by default called “main”, but you can create more branches to have various version of your project coexist. All a branch is is a named pointer to a commit, and it can change which commit it points to - for example, say you’re working on a new feature for a game, you may have a branch named after that feature, and each time you finish a bite-sized piece of that feature, you make a new commit to save your progress, the branch will update to point to the latest commit. Making a pull request (or a “PR”) is asking a code owner to add your commits to a particular branch’s history.
forks are when you clone someone else’s repo and make your own version of it branches are timelines in the same universe while forks are a different universe all together.
I still don’t get it…
Section titled “I still don’t get it…”A “repository” is the place where your code is hosted!
A “branch” is where you can make changes to the main code without worrying about breaking everything. If you do break things, you can switch to the main branch and delete the defective branch (if you want) as if they never existed.
A “fork” is your own version of your code. Let’s use the TS4-Modders-Reference repo as an example. If you go to the website and look at the right, you’ll see a button that says “forks”. There, you’ll see my own fork of the site! Depending on when you’re reading this, it’ll be exactly the same as the original repo, or it might have some differences and changes waiting to be approved.
Any changes I make in my own fork are in my machine only, and won’t be a part of the actual website unless I make a pull request, and said pull request is accepted and merged with the original repo.
What’s the difference between a “fork” and a “branch”?
Section titled “What’s the difference between a “fork” and a “branch”?”A branch is made in the original repo. A fork is a different repo.
Only people who have specific permissions on a repo can make new branches, make pull requests and make changes. You don’t need these permissions to make a fork. But you can still use these forks to contribute to said repo!
What’s a pull request?
Section titled “What’s a pull request?”A pull request is a way to tell the owner of the repo on GitHub “Hey, I made these changes! Do you want to make them part of your project?”
If you want to know more, here’s the Git documentation. I understand it’s a lot for a first timer, so I’ll cover only what you need to know about Git to contribute to this website.
Why do I have to make a fork? Why can’t I make my own branch directly in the repo?
Section titled “Why do I have to make a fork? Why can’t I make my own branch directly in the repo?”Because you’re not authorized to change or edit the original repo in any way, shape or form. Neither am I. This is for security, and to prevent anyone from griefing the website!
I don’t know how to use the command console
Section titled “I don’t know how to use the command console”Don’t worry! GitHub Desktop exists! And you can download it here.
Be warned, you’ll have to use the console later. Just a little, so you can install some things you need, and test your changes. It’s literally three commands and that’s it.
I have GitHub Desktop. Now what?
Section titled “I have GitHub Desktop. Now what?”We’re going to need GitHub Desktop, a GitHub account, and an IDE. If you don’t know what an IDE is, or you don’t know which one to get, just use Visual Studio Code. Is the one I use.
Go back to GitHub Desktop and go to File -> Clone Repository. Then, click on the “URL” tab and copy the link to the repo. Then pick where you want your fork to be, and name it accordingly. My fork is named “TS4-Modders-Reference-JimanthasCut” because I thought it was really funny.
From here, click on the button “current branch” and make a new branch. Name it whatever you want. I named my current branch “tutorial”.
You’ll see something similar to this.
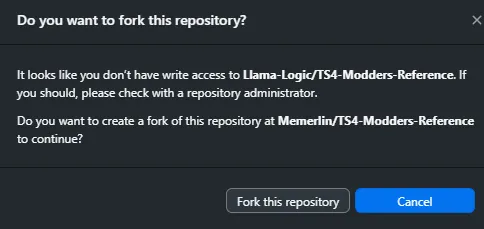
Click “Fork this repository”
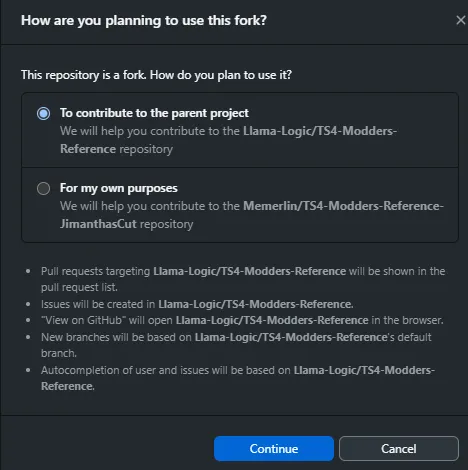
When it asks you what do you want to do with this fork, put “To contribute to the parent project” and then click “continue”.
This is the part where it should ask you what to name your fork. Give it a descriptive name! And avoid cussing in its title.
Now that we have our own fork, we can click on the “Open in Visual Studio Code” button, and then you’ll see all the files that build the Modders Reference Website. Feel free to check them out, change them, break them, experiment, learn how it works! You’ll have a blast.
How do I add a link to a tutorial?
Section titled “How do I add a link to a tutorial?”The big advantage about Astro is that it uses markdown, and markdown is very friendly since you don’t need to know how to program to write your tutorials. If you use discord or Obsidian, you’re already familiar with markdown. If you’re still unsure of how it works, feel free to check this guide.
Take a look at the files in the repo. There’s many folders. There are two files that interest us, both inside src/content/docs/tutorials : index.md and links-offsite-tutorials.md.
Let’s tackle links-offsite-tutorials.md first.
links-offsite-tutorials.md
Section titled “links-offsite-tutorials.md”Here, you’ll see we order the tutorials alphabetically. This is NOT done automatically at the time of writing this, so please write it in the correct place.
Once you identified where your tutorial should be, use markdown to put it in like this:
### [Tutorial Name](link) by YourNameOrUsername> Description goes hereIn the end, your link should look similar to the example below:
### [Sims 4 Debugging Tips](https://imtheproblemitsjim.neocities.org/Sims%20content/Sims%204%20Modding/ModdingDebuggingTips), by Jimantha
> It gives a glimpse on how to debug, which tools to use, and some general advice on problem-solving and when to ask for help
And in the website, that will look like this:

If you want to know why it works like this, please check out Why does THAT work?(Markdown explanation).
index.md
Section titled “index.md”Here, you’ll see that the <summary>Beginner Tutorials</summary> matches the menu you see on The Tutorials Index. And like “Beginner Tutorials”, there are other menus like “Modding Tools, Tuning Mods”, etc. After identifying where your tutorial would be best suited (it can be in multiple menus!), go to index.md in Visual Studio Code and look for the menu.
For example, let’s say your tutorial is better suited for “Walkthrough Type Tutorials”. You need to search for this part on the document:
<summary>Walkthrough Type Tutorials</summary>
Note: Once again, tutorials aren’t automatically sorted alphabetically. So, please put your tutorial in the right place!
This time, the syntax you need to use is a little different, but nothing complicated!
* [Tutorial Name](../tutorials/links-offsite-tutorials/#tutorial-name-in-links-offsite-tutorials-by-YourName), by YourNameI know it looks very confusing at first glance! But if you write the # in Visual Studio Code, you’ll notice it’ll try to autocomplete. Like this!

You can simply click your own tutorial from that list, and add “by YourName” at the end.
It should look something similar to this:
* [Social Bunny Tweaks](../tutorials/links-offsite-tutorials/#social-bunny-tweaks-by-jimantha), by JimanthaIf you want to know why it works like this, please keep reading.
Why does THAT work? (Markdown explanation)
Section titled “Why does THAT work? (Markdown explanation)”Explaining links-offsite-tutorials.md
Section titled “Explaining links-offsite-tutorials.md”The ### tells markdown “This is a header, so I want the text to be THIS big”. It also creates an anchor point in the page, so you can link to just that place!
Further explanations on anchors
Let’s say you want to link to the “Formatting” section of the Contribution Guidelines. You can do it like this!
[Contribution Guidelines](../about/contribution-guidelines#formatting)Give it a shot! Contribution Guidelines
The [Tutorial Name](link) is syntax for “I want this text to redirect the user to this link when clicked”.
The > is simply to put the description of what your tutorial does.
Explaining index.md
Section titled “Explaining index.md”In markdown, we make lists using the * symbol.
This time, instead of linking to a different website, we’re linking to something that’s within this website itself. This is called a relative link, and it’s great for everyone! Keeps consistency, makes things easy to search and look for, and makes sure that during your tests you’re still testing the site on your computer instead of the site on the internet.
This is not only important for this website, but it’s also important for making your own websites, if that’s something you’d like to experiment with!
We also use the # to create bookmarks within a website. This is so you can go to a section of a site quicker, instead of scrolling for an undetermined period of time, looking for a specific section. This is especially useful for long sites that have a lot of content.
How do I write a tutorial directly on the site?
Section titled “How do I write a tutorial directly on the site?”Go to the src/content/docs/tutorials folder and make a new file with the .md extension. Name it after the subject of your tutorial. Some examples are:
modifying-sim-appearances.mdxml-extractor.mdRemember to read The Contribution Guidelines!
How do I put images to my tutorial?
Section titled “How do I put images to my tutorial?”You need to put the image inside the assets folder. Give it a descriptive name, along with your creator name at the end. Something like the example below.
vsc-autocomplete-example-jimantha.pngThen, to show it on the website, you need to do it like so:
This needs to follow The Contribution Guidelines! too.
I want to add my biography to the contributors page, or I want to change it
Section titled “I want to add my biography to the contributors page, or I want to change it”This is a piece of cake once you did everything else!
On Visual Studio Code, go to src/assets/content/docs/about, and open contributors.mdx.
Here, once again, the alphabetical sort is NOT automated, so put yourself in the right place!
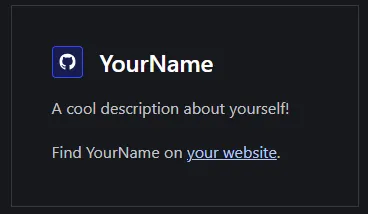
Once you figured out where you should be, follow this syntax:
<Card title="YourName" icon="YourFavouriteIcon">
        A cool description about yourself!


        Find YourName on [your website](link).    </Card>
I’m going to be honest, I have no idea why or how this works, but it looks nice!
Note: You can get the icons from this site.
You can also add your own image in your bio. You just need to follow the syntax in How do I put images to my tutorial?.
Feel free to use both an icon and your own image, if you wish!
How do I see my changes?
Section titled “How do I see my changes?”Remember I told you you’ll have to use the console briefly? Yeah, this is it!
You can do this either on the Terminal you see in Visual Studio Code, or you can do it in the PowerShell. I recommend you do this inside VSC because you won’t have to switch between windows.
Click on the terminal and write “npm install”. You can read about npm here. This is what let us install all the packages we need to properly see and test our changes locally.
Once you did that, and it finishes installing, write “npm run dev”. Wait a little, and then you’ll see the following:
 astro  v5.12.3 ready in 12 ms
┃ Local    http://localhost:4321/┃ Network  use --host to expose
Press CTRL and click on the link. On your browser, you’ll see a replica of this website… but in your computer! Isn’t that fun? You can keep that tab open and it’ll automatically refresh each time you make a change.
If everything is working, and just to be safe, please go back to Visual Studio Code, click on the console and press “CTRL + C” to exit the development version of the site. Then run “npm run build” and “npm run preview” to do another test. Again, just to be safe!
Is it working? Great! Keep reading for instructions on how to make the pull request.
You had an error? Please contact me on discord!
How do I make a pull request?
Section titled “How do I make a pull request?”You can do this either with Github Desktop or Visual Studio Code’s Github extension.
I recommend using Github Desktop if you don’t feel like messing more with VSC than you need to.
Once you made all of your changes, open Github Desktop. You should see the current repository, as well as your current branch. To the left, you’ll see all of the changes you’ve made.
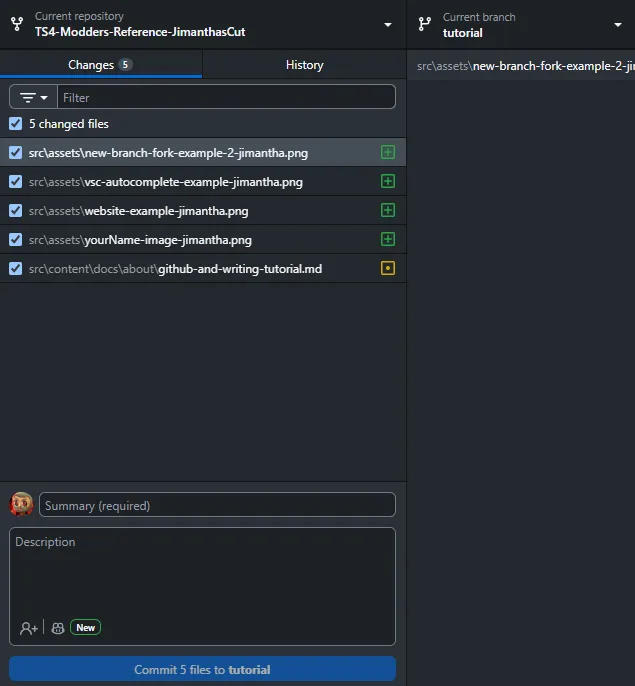
In “Summary(Required)” write a summary of the changes you’ve made. "Finishing "github-and-writing-tutorial.md" is a good option! Obviously, you can write whatever you want here. Just make sure is understandable for you and others. Remember this is public!
You can also extend yourself with the description. This is public too!
Once you’ve done that, click on the button that says Commit X files to branch-name. My branch name is “tutorial”, and at the time of the screenshot, I made 6 changes, so my button says Commit 6 files to tutorial.
Once you’ve clicked that button, and the committing is done, you’ll see this below.
![]()
To the upper part of GitHub desktop, there’ll be a button that says “Push origin”.
![]()
Press it.
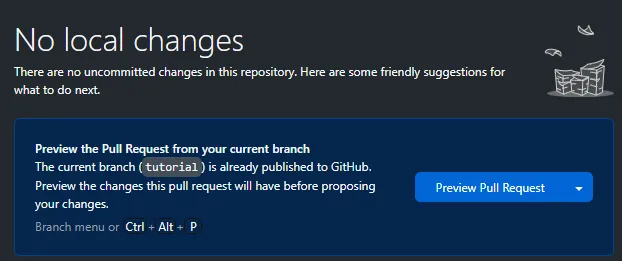
After that, you’ll see the option to Preview Pull Request in the main menu.
When you press the Preview Pull Request button, you’ll be taken to the preview of your pull request. On the drop down menu, select “upstream/main” and then Create pull request.
You’ll be taken to Github’s website, where you’ll be able to add a title and a description of all the changes you’ve made. Once that’s done, click on the green Create pull request button.
Congratulations! You just made the pull request!
Fun fact: You can see my own pull request, along the history of changes, here!
What’s next?
Section titled “What’s next?”You wait! GitHub should give you a notification and an email once your pull request gets merged. Or if it has comments requesting changes.
Remember, it isn’t instant! People have a life outside modding. Pull requests will be reviewed eventually.
In the meantime, thank you for contributing to The Sims 4 Modders Resource, and I hope this tutorial was useful.
See you around!